Tuesday, May 31, 2011

Visio shapes for BizTalk Server

Thanks to Harold Hoffman

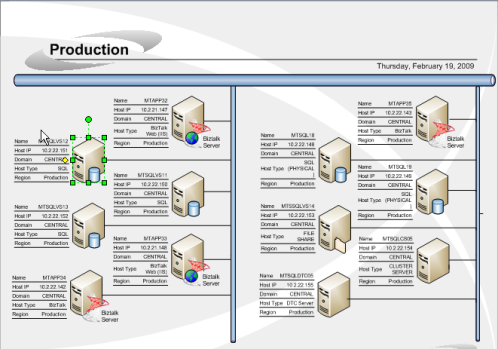
I was tasked to create a visio diagram of all our BizTalk servers and related servers (SQL Server etc..) in their respective environments. (DEV, QA, Staging and Production)
Figure 1 is an image of the visio diagram for the production environment.
Production
Production
Figure 1.
Figure 2 shows a BizTalk Server with IIS shape.
biztalk_shape
Figure 2.
Visio can retrieve the server data from a sharepoint list and link the data to the server shapes by a simple drag and drop process. You can manually refresh the data from the sharepoint site or schedule an automatic update.
I created 2 visio shapes, one for BizTalk Server and one for BizTalk Server with IIS, to more quickly convey the server landscape for each environment.
You can download these 2 shapes from here. The download file is a .vss file but for some reason it appears as a .vsd file in the download dialog box. Just change it to .vss before saving it to your hard disk.

Monday, May 30, 2011

BizTalk Talk (Speech) Adapter - Screencast and download


BizTalk Talk (Speech) Adapter - Screencast and download

Thanks to ... Mikael... wow... worth trying...
So BizTalk can walk the walk, -but can it TALK the TALK?
I sincerely hope this adapter will come to the rescue, upon deploying your mission critical solution.
Yes I know, I got to much spare time...but here is the download.

Thursday, May 26, 2011

BizTalk 360 - Awesome Product

http://biztalk360.com/Default.aspx
I am going to post more details and reviews on this soon... for now... have a look at this awesome Silverlight Admin Console for our dear BizTalk :)


BizTalk 360

Monday, May 16, 2011

Processing Inter-dependent files using a Non-Uniform Sequential Convoy


Processing Inter-dependent files using a Non-Uniform Sequential Convoy - Kent

The Problem


A re-occurring topic that I have recently come across on some of the BizTalk forums(here and here) is the ability to process interdependent files. More specifically we want the ability to process a particular file after receiving a "trigger" or "signal" file.

The use of trigger and signal files is very common in SAP and mainframe systems. A common pattern in the SAP world is to write "work" files to a "work" folder and a "signal" file to a "sig" folder. For SAP outbound files, the SAP system will write data files to the work folder, once the file has been completely written, a signal file will be written to the sig folder. This sig file gives the Middleware, or downstream system, an indication that this file is safe for processing. This is important as some files that get written from these types of systems are very large or may be written to over a period of time via batch jobs.


BizTalk supports messaging patterns that provide the ability to wait for messages to arrive before completing a business process(or orchestration). These mechanisms tend to use correlation and the use of convoys. Stephen W Thomas has written a whitepaper that dives into these topics further.


The messaging pattern that I have chosen to aid in this solving this challenge is the Non-Uniform Sequential Convoy. This pattern's mandate is to process 2 or more messages in a known order.


The challenge with this pattern, for our scenario, is that our work file is written prior to the sig file, but in terms of BizTalk processing messages we want BizTalk to only process the work file once the sig file has been written.


In order to solve this problem we are going to leverage a .Net Helper class to do some of the lifting.


Solution
I have written a proof of concept(POC) app to demonstrate the pattern. The solution is pretty light and easy to implement. It contains 2 message schemas(1 for the signal file, 1 for the work file), a property schema, an orchestration and a .Net Helper class. Note, that I have left what you do with both files once you get them into the same instance of the orchestration out of scope. At this point your requirements will determine what you need to do with both files.


The first artifact that will dive into is the Signal file. The file itself does not need to contain a lot of data. For my sample I have two elements, a timestamp and a WorkFileName. In order to use my convoy, I need to create a correlation type and correlation set. A correlation type requires a promoted property(or BizTalk System property) in order to "link" multiple messages to one running instance of an orchestration. For more information on Correlation, please see the following document.


The second artifact represents data that could be generated by an upstream system such as SAP or a Mainframe. This document is entirely fictitious so don't look too much into it. Also note that I have a promoted property called FileNamethat is used in my Correlation Type.


So for this example I am using FileName but you can correlate based upon any data, as long as your signal file and work file promote the same data values.


Below is a snapshot of what our orchestration looks like.


A few things to note is that Non-Uniform Sequential convoys to require that both receive shapes connect to the same receive port. This logical receive port also needs to be marked for Ordered Delivery.


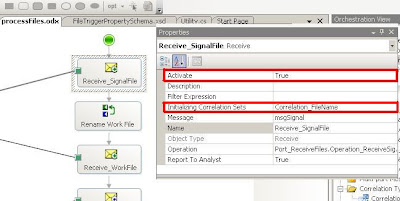
For the initial receive shape we need to set a few properties. Since this is the first Receive shape we need to set theActivate property to True in order to instantiate the orchestration.


The other property that we need to populate is the Initializing Correlation Sets. In order for BizTalk to "wait" for the work file to be picked up by the same instance of the orchestration that consumed the signal file we need to initialize a correlation set. (Keep reading for more info on how to create the Correlation Set).


Prior to creating a Correlation Set, you need to create a Correlation Type. You can do this from the Orchestration Viewtab.
We want to create the Correlation Type based upon the element/attribute that we promoted in each of the two schemas.
We then need to create a Correlation Set, which is instantiated by the initial Receive Shape, that is based upon the Correlation Type that was just created. Correlation Sets are also configured in the Orchestration View tab.


In the Rename Work File Expression shape we are going to call a .Net Helper class that will aid in renaming work file in the source folder. This step is a critical step in the process. Since the work file is completely written before the sig file is, we cannot use the original file extension in the Receive Location file mask. Otherwise, this would prompt BizTalk to consume the work file prior to us wanting it to be consumed. By appending a temporary extension, like .BIZ, to the end of the work file name, we can be assured that BizTalk will pick the file up when we want it to. So in the Receive Location we will use a *.BIZ extension instead of a *.XML.


Note that I have hard coded the path of the source location. Since this is a POC, this is ok but this would not be a suitable solution for a production environment


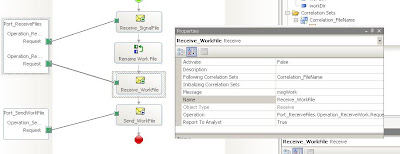
In order for BizTalk to "wait" for the work file to be picked up, we need to set the Following Correlation Sets property with the same Correlation Set that we initialized in the first Receive shape. Since the rename operation occurs the step before, the "wait" time will be extremely small. The main point here is that we want to control when BizTalk picks up the work file. It is essentially the rename operation and the second receive shape/location that controls this.
Now that you have consumed both the signal file and work file, in order, you can finish up any processing that is required by your business requirements. Since this is just a POC, I output the work file to a folder.


Testing
In order to simulate how an upstream system would write the files, I drop a file into the work folder with the original extension. I then drop a sig file into the sig folder. The sig file will get picked up and BizTalk, via the .Net Helper, will rename the work file. The receive location, for work files, will then pick up the work file and the orchestration will finish processing both files.


Conclusion
Through the use of a Messaging Pattern and with the help of a .Net Helper class we can process a set of files in a known order.

Kent Weare's BizTalk Blog: Processing Inter-dependent files using a Non-Uniform Sequential Convoy

Wednesday, May 11, 2011

Biztalk 2010 You are attempting to install Windows SharePoint Services Adapter Web Service on a virtual server that has not been configured with Windows SharePoint Services


Biztalk 2010 You are attempting to install Windows SharePoint Services Adapter Web Service on a virtual server that has not been configured with Windows SharePoint Services


Original Error ....

TITLE: Microsoft BizTalk Server Configuration Wizard
------------------------------


You are attempting to install Windows SharePoint Services Adapter Web Service on a virtual server that has not been configured with Windows SharePoint Services. Refer to the documentation for instructions on extending a virtual server. (CWssAdaCfg)


For help, click: http://go.microsoft.com/fwlink/events.asp?ProdName=Microsoft+BizTalk+Server+2010&ProdVer=3.9.469.0&EvtSrc=CWssAdaCfg&EvtID


------------------------------
ADDITIONAL INFORMATION:


You are attempting to install Windows SharePoint Services Adapter Web Service on a virtual server that has not been configured with Windows SharePoint Services. Refer to the documentation for instructions on extending a virtual server. (CWssAdaCfg)


For help, click: http://go.microsoft.com/fwlink/events.asp?ProdName=Microsoft+BizTalk+Server+2010&ProdVer=3.9.469.0&EvtSrc=CWssAdaCfg&EvtID


------------------------------
BUTTONS:


OK
------------------------------

Solution

I was able to resolve the issue you describe by doing the following:
1. Start SharePoint 2010 Centa Administration
2. Under Application Management, select Manage web application
3. Select one of the web applications (other than the Central Administration v4)
4. Click Extend on the ribbon bar (2nd button from the left)
5. Open BizTalk Server Configuration.  Click SharePoint Adapter
6. Select the site you just extended in the Windows SharePoint Services Adapter Web Site dropdown list.

I will update the images soon....

Archiving and Purging the BizTalk Tracking Database

Archiving and Purging the BizTalk Tracking Database

As BizTalk Server processes more and more data on your system, the BizTalk Tracking (BizTalkDTADb) database continues to grow in size. Unchecked growth decreases system performance and may generate errors in the Tracking Data Decode Service (TDDS). In addition to general tracking data, tracked messages can also accumulate in the MessageBox database, causing poor disk performance.
While previous versions of BizTalk Server included sample scripts for archiving tracked messages and purging the BizTalk Tracking database, BizTalk Server automates both processes using the DTA Purge and Archive job. By archiving and purging data from the BizTalk Tracking database, you can maintain a healthy system, as well as keep your tracking data archived for future use. Because BizTalk Tracking database archives accumulate over time and consume disk space, it is a good idea to move the BizTalk Tracking database archives to secondary storage on a regular basis.
When you purge data from the BizTalk Tracking database, the DTA Purge and Archive job purges different types of tracking information such as message and service instance information, orchestration event information, and rules engine tracking data.
The age of a tracking data record is based on the time the tracking data was inserted into the BizTalk Tracking database. The DTA Purge and Archive job uses the time stamp to continuously verify whether the record is older than the live window of data. After every live window period, the BizTalk Tracking database is archived and a new archive file is created. At each SQL Server Agent job interval specified by the job schedule, all completed tracking data older than the live window period is purged.
BizTalk Server uses the concept of a soft purge and a hard purge. The soft purge is used to purge completed instances, while the hard purge is only used to purge incomplete instances.
Soft purge
In the DTA Archive and Purge job, the sum of the LiveHours and LiveDays parameters is the live window of data you want to maintain in your BizTalk Server environment. All data associated with a completed instance older than this live window of data is purged. By default, the DTA Archive and Purge job is not enabled. You must first configure and then enable the job.
For example, you can configure the DTA Purge and Archive job to run every 20 minutes, and set LiveHours=1 and LiveDays=0. The first time this SQL Server Agent job runs (T0), it takes a backup of the tracking database by creating an archive and an entry is saved in the database with this timestamp. A successful archive is necessary in order to purge tracking data. If the archive was successful, then all the data associated with the instances that completed over an hour ago is purged. Each time the job runs, completed data over one hour old is purged. On the 3rd run (after one hour), a new archive is created that contains the data for all instances that were inserted into the tracking database in the last one hour segment.
Here is how you would configure the Archive and Purge step in the DTA Purge and Archive job to match the example above:
exec dtasp_BackupAndPurgeTrackingDatabase
1, --@nLiveHours 1, 
0, --@nLiveDays 
1, --@nHardDeleteDays 
‘\\server\backup’, --@nvcFolder 
null, --@nvcValidatingServer 
0 --@fForceBackup Soft purge process
The time stamp of the last backup is stored in the BizTalk Tracking database and ensures that data is only purged if it is in the previous archive. For additional reliability, archives are overlapped by approximately 10 minutes. The following figure, based on the example above, shows the soft purge process. Note that the archiving and purging tasks do not necessarily happen at the same time.
Soft purge process
Soft purge processHard purge
Because the soft purge only purges data associated with completed instances, if you have many looping instances that run indefinitely, then your tracking database would grow and these instances would never be purged. The hard purge date allows all information older than the specified interval to be purged except for information indicating a service's existence. You set the hard purge using the @nHardDeleteDays parameter in the Archive and Purge step in the DTA Archive and Purge job. The hard purge setting should always be greater than your soft purge setting. In other words, @nHardDeleteDays should be greater than the sum of @nLiveHours and @nLiveDays.
Archiving and purging includes the features described in the following table:


FeatureDescription
Hard purgeEnables you to configure a time interval to purge information for incomplete instances older than a specified date.
Copying tracked messages to tracking databaseUsing the CopyTrackedMessageToDTA option, you can directly copy tracked messages from the MessageBox servers to your BizTalk Tracking database. This is required in order to purge data using the DTA Purge and Archive job.
Archive validationEnables you to optionally set up a secondary database server to validate the archives as they are created.
Tracking support for multiple BizTalk Tracking database versionsEnables you to use tracking support with BizTalk Server 2004 and BizTalk Server 2006 database archives.
Reduction of tracking dataSubstantially reduces the amount of tracking data stored without reducing any tracking information generated. This results in slower growth of the tracking database.
Faster tracking operations, significant optimization in database schemasEnables you to use tracking tasks for finding messages and service instances on large databases; this feature has been significantly optimized.
noteNote
If you are having performance issues that are momentarily addressed by purging the BizTalk tracking database, and you want to configure BizTalk to no longer collect tracking information, you may want to consider turning off global tracking. For information about turning off global tracking, see How to Turn Off Global Tracking.

In This Section

Monday, May 9, 2011

BizTalk: SharePoint Adapter in BizTalk Server

BizTalk: SharePoint Adapter in BizTalk Server

SharePoint Adapter in BizTalk Server

In this post I would like to show how to insert records to SharePoint
using BizTalk Server 2010

Scenario: At the end of demonstration I will put XML file to a folder
which will be transfered to SharePoint list

first you need to install SharePoint Server 2010 or SharePoint Foundation


I will choose standalone installation option.

When installation process will finish I will select to configure SharePoint
and setup a web site which will use for exporting data
You will need that web site later when configuring BizTalk

When SharePoint configuration will finish
Start BizTalk installation wizard
in case if you have already installed BizTalk
choose Modify option and check just SharePoint option

When installation will complete, start BizTalk Server Configuration Wizard
Choose SharePoint Adapter from Options
and check Enable Windows SharePoint Services Adapter on this Computer

Without SharePint installation these options will be disabled.

Add your BizTalk service account to newly created SharePoint Enabled Hosts group
to enable access to SharePoint as a contributor, otherwise you will have security exceptions

No I will create List in SharePoint
Open SharePoint Web Site by default you can openhttp://localhost
1. Click Site Actions
2. Click More Options..
3. Select Custom List
4. In Name box enter News and click Create
5. From List Settings click on Create Columns
6. Create Short DescriptionLong Description and Datecolumns

7. Create new BizTalk project
8. Create schema for News


9. Build and Deploy BizTalk project to News Application
10. Generate an instance from schema

11. Create a folder and put an XML to it
12. Open BizTalk Administration Console
13. Open News application
14. Create Receive Port and Location which will take XML files from folder
15. Create Static One-Way Send Port
16. Choose Windows SharePoint Services


17. Open Configuration settings
18. In Destination Folder URL type Lists/News
19. In SharePoint Site URL type http://localhost
20. Fill in column values
Apply all settings
drop XML file to input folder and check your SharePoint list for appeared records.
FEEDJIT Live Traffic Map